In part two of my XKCD font saga I was able to separate strokes from the XKCD handwriting dataset into many smaller images. I also handled the easier cases of merging some of the strokes back together - I particularly focused on "dotty" or "liney" type glyphs, such as i, !, % and =.
Now I want to attribute a Unicode character to my segmented images, so that I can subsequently generate a font-file. We are well and truly in the domain of optical character recognition (OCR) here, but because I want absolute control of the results (and 100% accuracy) I'm going to take the simple approach of mapping glyph positions to characters myself.
If you'd like to follow along, the input files for this article may be found at https://gist.github.com/pelson/b80e3b3ab9edbda9ac4304f742cf292b, the notebook and output may be found https://gist.github.com/pelson/1d6460289f06acabb650797b88c15ae0.
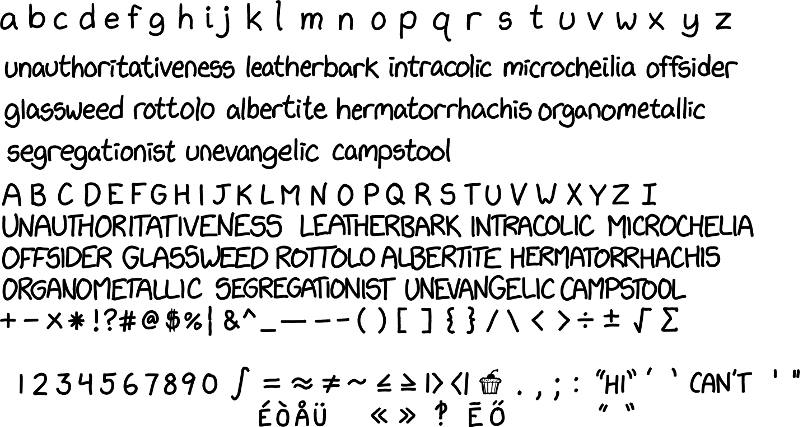
As a reminder, here is a down-sampled version the XKCD handwriting file:

First, I want to read in the files that we produced previously. These can be found at https://gist.github.com/pelson/b80e3b3ab9edbda9ac4304f742cf292b.
I get metadata from the filename using the excellent parse library.
import glob
import os

import matplotlib.pyplot as plt
import numpy as np
import parse


pattern = 'stroke_x{x0:d}_y{y0:d}_x{x1:d}_y{y1:d}.png'
strokes_by_bbox = {}
for fname in glob.glob('../b80e3b3ab9edbda9ac4304f742cf292b/stroke*.png'):
    result = parse.parse(pattern, os.path.basename(fname))
    bbox = (result['x0'], result['y0'], result['x1'], result['y1'])
    img = (plt.imread(fname) * 255).astype(np.uint8)
    strokes_by_bbox[bbox] = img
In order to map strokes to glyphs, I'm going to want to sort them first by line, then from left to right.
At this point, I could either hard code the approximate y location of each baseline or attempt to cluster them. I opt for the latter, using a k-means implementation from scipy.cluster.vq.kmeans.
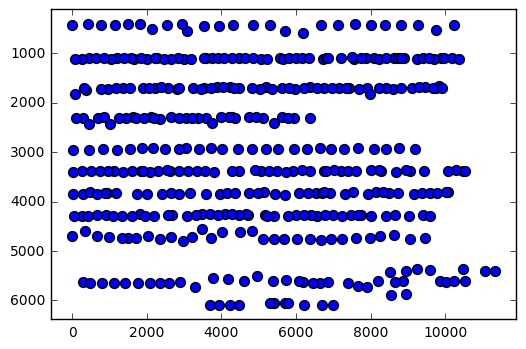
To confirm I have the correct information and to visualise the data before clustering, I plot the baseline point (maximum y pixel location) of the stroke against its left-most x position:
import matplotlib.pyplot as plt
import numpy as np

xs, ys = zip(*[[bbox[0], bbox[3]]
               for bbox, img in strokes_by_bbox.items()])
xs = np.array(xs, dtype=np.float)
ys = np.array(ys, dtype=np.float)
plt.scatter(xs, ys, s=50)
plt.gca().invert_yaxis()
plt.autoscale(tight=True)
plt.show()
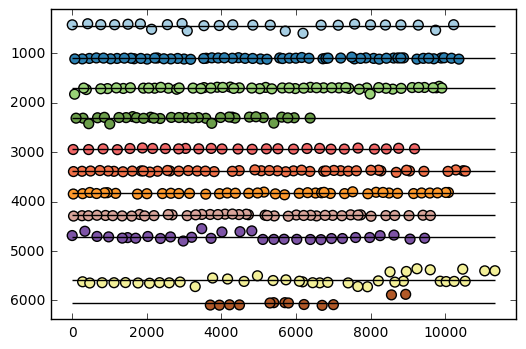
There appears to be enough structure to group the glyphs into lines... let's go for it.
import scipy.cluster.vq

n_lines = 11

lines, _ = scipy.cluster.vq.kmeans(ys, n_lines, iter=1000)
lines = np.array(sorted(lines))

print('Approx baseline pixel of lines:', repr(lines.astype(np.int16)))

# Plot the strokes, and color by their nearest line.
plt.scatter(xs, ys, s=50,
            c=np.argmin(np.abs(ys - lines[:, np.newaxis]), axis=0), cmap='Paired')
plt.gca().invert_yaxis()
plt.autoscale(tight=True)

# Draw the line positions
plt.hlines(lines, xmin=0, xmax=xs.max())
plt.show()
Using the baseline position, group the strokes into their respective lines, and then sort each line from left to right.
glyphs_by_line = [[] for _ in range(n_lines)]
for bbox, img  in list(strokes_by_bbox.items()):
    nearest_line = np.argmin(np.abs(bbox[3] - lines))
    glyphs_by_line[nearest_line].append([bbox, img])

# Put the glyphs in order from left-to-right.
for glyph_line in glyphs_by_line:
    glyph_line.sort(key=lambda args: args[0][0])
Let's take a look using the same notebook trick we did in part 1...
from IPython.display import display, HTML
from io import BytesIO
import PIL
import base64


def html_float_image_array(img, downscale=5, style="display: inline; margin-right:20px"):
    """
    Generates a base64 encoded image (scaled down) that is displayed inline.
    Great for showing multiple images in notebook output.

    """
    im = PIL.Image.fromarray(img)
    bio = BytesIO()
    width, height = img.shape[:2]
    if downscale:
        im = im.resize([height // downscale, width // downscale],
                       PIL.Image.ANTIALIAS)
    im.save(bio, format='png')
    encoded_string = base64.b64encode(bio.getvalue())
    html = ('<img src="data:image/png;base64,{}" style="{}"/>'
            ''.format(encoded_string.decode('utf-8'), style))
    return html
To keep this somewhat short, I'll just show a few lines:
for glyph_line in glyphs_by_line[::4]:
    display(HTML(''.join(html_float_image_array(img, downscale=10)
                         for bbox, img in glyph_line)))
Now the tedious part - mapping glyph positions to characters (and ligatures)...
paragraph = r"""
a b c d e f g h i j k l m n o p q r s t u v w x y z
u n a u t h o r i t a t i v e n e s s   l e a t h e r b a r k   i n t r a co l i c   m i c r o c h e i l i a   o f f s i d e r
g l as s w e e d   r o t t o l o   a l b e r t i  t e   h e r m a t o r r h a c h i s   o r g a n o m e t a l l i c
s e g r e g a t i o n i s t   u n e v a n g e l i c   c a m p s t oo l
A B C D E F G H I J K L M N O P Q R S T U V W X Y Z I-pronoun
U N A U T H O R I T A T I V E N E S S   L EA T H E R B A R K   I N T R A CO L I C   M I CR OCH E L I A
O F F S I D ER   G LA S S W EE D   R O TT O L O   A LB E R T I T E   H ER M A T O RR H A C H I S
O R G A N O M E T A LL I C   S E G R E G A T I ON I S T   U N E V A N G E L I C   CA M PS TO O L
+ - x * ! ? # @ $ % ¦ & ^ _ - - - ( ) [ ] { } / \ < > ÷ ± √ Σ
1 2 3 4 5 6 7 8 9 0 ∫ = ≈ ≠ ~ ≤ ≥ |> <| 🎂 . , ; : “ H I ” ’ ‘ C A N ' T ' "
É Ò Å Ü ≪ ≫ ‽ Ē Ő “ ”
""".strip()
paragraphs = [[char for char in line.replace('   ', ' ').split(' ') if char]
              for line in paragraph.split('\n')]
As I mentioned in the previous post, joining together all strokes into constituent glyphs wasn't easily achievable. We therefore have four glyphs that each require two strokes to be merged before we can map them to the appropriate unicode character(s). The glyphs in question are |>, <|, ≪ and ≫.
glyphs_needing_two_strokes = ['≪', '≫', '|>', '<|']
We need the function from part 2 which merges together two images:
def merge(img1, img1_bbox, img2, img2_bbox):
    bbox = (min([img1_bbox[0], img2_bbox[0]]),
            min([img1_bbox[1], img2_bbox[1]]),
            max([img1_bbox[2], img2_bbox[2]]),
            max([img1_bbox[3], img2_bbox[3]]),
            )
    shape = bbox[3] - bbox[1], bbox[2] - bbox[0], 3
    img1_slice = [slice(img1_bbox[1] - bbox[1], img1_bbox[3] - bbox[1]),
                  slice(img1_bbox[0] - bbox[0], img1_bbox[2] - bbox[0])]

    img2_slice = [slice(img2_bbox[1] - bbox[1], img2_bbox[3] - bbox[1]),
                  slice(img2_bbox[0] - bbox[0], img2_bbox[2] - bbox[0])]

    merged_image = np.zeros(shape, dtype=np.uint8)
    merged_image.fill(255)
    merged_image[img1_slice] = img1
    merged_image[img2_slice] = np.where(img2 != 255, img2, merged_image[img2_slice])
    return merged_image, bbox
characters_by_line = []

for line_no, (character_line, glyph_line) in enumerate(zip(paragraphs, glyphs_by_line)):
    glyph_iter = iter(glyph_line)
    characters_this_line = []
    characters_by_line.append(characters_this_line)

    for char_no, character in enumerate(character_line):
        bbox, img = next(glyph_iter)
        if character in glyphs_needing_two_strokes:
            other_bbox, other_img = next(glyph_iter)
            img, bbox = merge(img, bbox, other_img, other_bbox)
        characters_this_line.append([character, bbox, img])
import html
for line in characters_by_line[-3:]:
    display(HTML(''.join(html.escape(char) + html_float_image_array(img)
                         for char, bbox, img in line)))
Finally, save out each glyph as a PPM.
import skimage.io


replacements = {'/': 'forward-slash', '_': 'underscore'}

for line_no, line in enumerate(characters_by_line):
    for char_no, (char, bbox, img) in enumerate(line):
        char_repr = '-'.join(replacements.get(c, c) for c in char)
        hex_repr = '-'.join(str(hex(ord(c))) for c in char)

        fname = ('char_L{}_P{}_x{}_y{}_x{}_y{}_{char_repr}_{hex_repr}.ppm'
                 ''.format(line_no, char_no, *bbox, char_repr=char_repr, hex_repr=hex_repr))
        skimage.io.imsave(fname, img)
Conclusion
In this edition, I merged the few remaining strokes together to produce the finished glyphs, and classified each of the glyphs with associated characters (mostly Unicode). I then saved these rasters out to a semantic filename in the PPM format. Next up, convert the rasters to vector SVGs so that we can import them into our font tool programmatically.
The next article in this series is: Converting PPM to SVG, and creating a font with FontForge.

